I can’t believe it’s been almost a year since I started this crazy second childhood journey. I went from, -hey those dolls are creepy! – to, Hmm, actually , they are kind of endearing, to, I must make one of every color and facial expression and clothing style and a room box for each room and the list goes on. I feel like I’ve been on a dead run making dolls this past year and I just about have. It’s painful to look at my first attemps( although I loved each one that I completed). I’ve improved alot, but then, there was a lot of room for improvement. I just finished custom #34, I have 4 dollies sitting on the shelf waiting to be customized and I have 5 in the mail coming to me from China. I have 5 finished dolls in my shop waiting for adoption and I have 1 that will be given away in a contest as a promotion for my shop on February 12th. Wow. My goal is to make my 100th doll before the end of the year. We shall see.

The Importance of MSC in Customizing A Blythe
I mentioned in an earlier post that I probably wouldn’t use the Mr.Super Clear Matte sealer again because of its extreme nastiness and health warnings. Well, I’ve done an about face on that. After I finished the original can that I had bought ( it was able to do 3 dolls) at a cost of about $20 if I remember – bought on eBay and took weeks to arrive, I decided to try a matte acrylic spray readily available at Joanne and/or other craft supply places in America . I tried 3 different clear matte sealer sprays. Not one of them came close to the look of Mr. Super Clear. The picture above you can see the difference. The face plate on the left is NOT MSC and has a wet shiny appearance which detracts greatly in photographing a Blythe. So I’m resolved to using MSC. However, I have now bought the more expensive $30 mask for spraying , which is only done outside in the open garage.

Blythe Adoption
Blythe adoption


My first customized Blythe to be adopted has found her new home! Thankfully she was adopted by a dear friend of mine so visits can be arranged. It’s amazing how attached one can become after spending hours and days creating a Custom Blythe. Little SeaCillia looks like she’s up for the adventure doesn’t she?
I hand delivered her and we took her to a concert and to Galveston to mark the occasion. (Picture above).Now it’s back home to start work on my girl with little blond corkscrew curls.

SEA-CILLIA! #3
I just have to be honest with you up front- I’m stalling. I need to be working on Custom #4. But the creative juices are still bubbling away in my head and havn’t hit on just what it is I want to do with her so ..here I am.
SeaCillia was an absolute pleasure to do. I’m happy with her. The carving went so fast because I knew just what I wanted the end result to be.
These dolls really do take on a life of there on- expressions just pop out of there faces. If you have the desire to try this – you should. It is very rewarding.


Blythe #2 – “CORDI”
I went ahead with my plan to Customize my second Blythe this week. She was an ICY Blythe to begin with- I am not crazy about the eye of shape she came with, mostly because I like making sleep eyes and you can’t do that with the smaller opening. I was pretty sure she could be helped with a little dolly surgery. And I was Right.
So this is Cordi – short for Cordillia, just as she was when she came to me from China- via Alliexpress. 
Like I said I like a larger rounded eye shape, so the extra eyelid part at the top will be cut out.
But first- I need to take the three screws out of the back of her head, using a tiny phillips screwdriver. 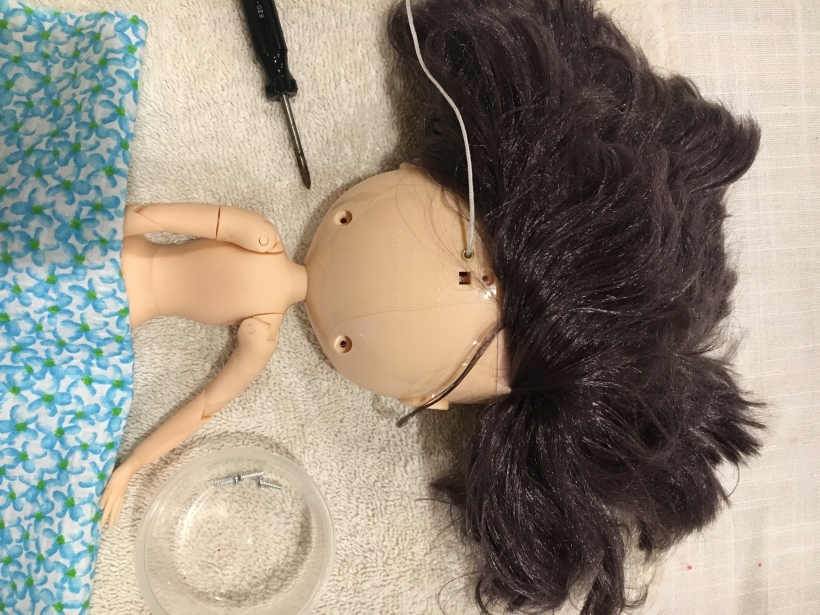 I put them in a little plastic dish with a lid along where I will put several other of her parts for safe keeping.
2. Then I release the little “spring” wire off from around the plastic bar in the center of the square whole at the back of her head. Here is a picture of the wire just halfway off. I use a small crochet hook to do this. (Can you Find the square hole in the picture below? That little hooky thing in the middle of the square whole is the tip of the spring. Once I push it off of that bridge, it releases her eye mechanism, and I can open her head)
With the screws out and the wire off, I am ready to pop the head apart. I Lay the doll on her side and apply pressure to her temple, putting the pressure more on the back side of her head rather than ton the face plate.  *Note – When I put her back together again- I will do much the same thing to snap the edges in together again. Only, at that time, I will apply the pressure more to the faceplate, rather than the back side of the head . (OOOOH ! SCARY HAND! – I promise I am NOT THAT OLD!!!)
 And the head pops open! At least that’s the way it has happened for me twice now. I have heard/read that it can actually be much more of a challenge than this. I have read other’s accounts saying that sometimes there is glue in the joint, or the head is just being stubborn. Maybe the bottom will pop open a crack and then it will be necessary to wedge something in the crack and ‘help’ it apart. However one does it, it is necessary to be careful not to damage the doll.
OOPS! – I forgot to tell you to take the plastic pull/ ring, off of the string. But that’s okay, you can do that now and put it in the same dish with the 3 screws. Then the back of the head will slip off of the string. 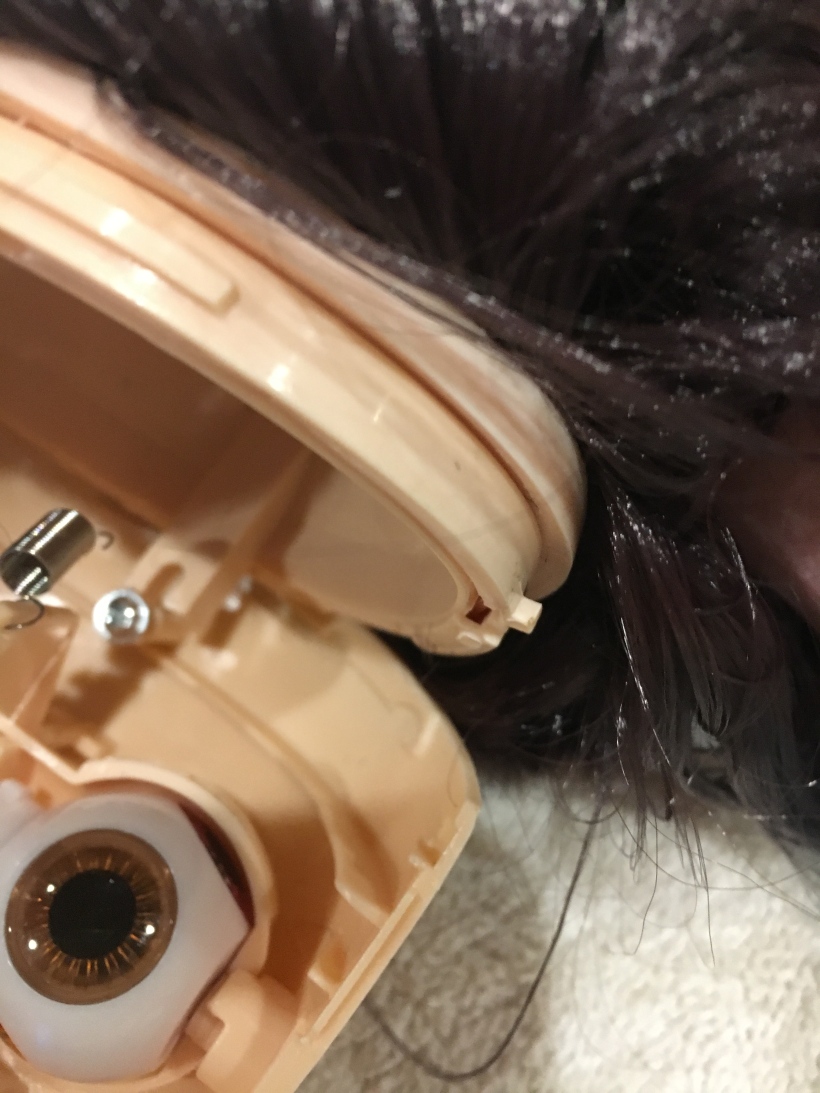
So, now that I have the back of the head off. I Unscrew the faceplate from the scalp. I just loosen the screw a bit and the scalp off. Thats the screw there in the photo above, just beside the spring that was unhooked. (Photo above)
(Photo Below) And this picture shows the scalp slipping off of the place that the screw was holding it to. This photo also shows the last screw to be undone. It is right below the eyes and it is holding a plastic, horshshoe-shaped t-bar in place.
I Unscrew the screw that you see in the picture above and remove it and I remove the T-bar and put them in the same dish as the other 3 screws from the back of the head. (I only LOOSENED the screw that held the scalp to the faceplate. It’s in an awkward place to screw back in, so it’s best to leave it there. ) If the plastic t-bar doesn’t come up right away, I use a screwdriver or some other tool to lever it up. It actually has a groove that fits down onto the plastic part below it, which is why it needs a little encourgement to ‘let go’. Here is a picture. 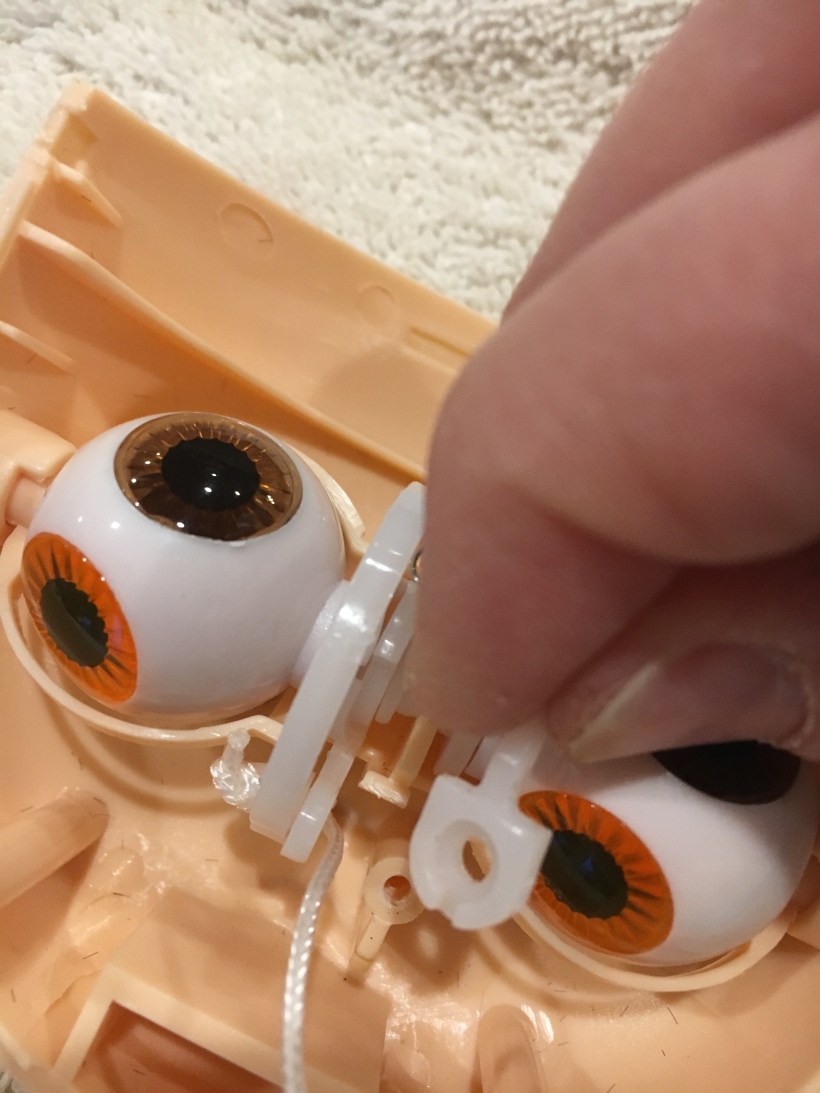 ON To DISMANTLEING THE EYEBALLS! I use a blowdryer as suggested in the Blytheverafter tutorial to warm up the plastic a little so it’s easier to bend and put a little pressure on the sides of the head and then pull the eyeball/eyelid unit out of the socket on one side of the head. (See picture below).
 My finger is pointing to it above. You can see that ‘down’ is the direction that you will need to go. You can also see that you really don’t need to spread that faceplate very much in order for it to release from it’s socket. Once one side comes out the other side slips out easily.
Next I need to remove the eyeball rod/ from the eyelids socket. I do that in much the same way as I did taking the whole unit out of the head only FIRST- I need to remove the square bracket from the clip that you can see in center of the picture below.  Can you see the white square wrapped around the flesh-colored clip at the center of the photograph? The clippy thing would be easy to break(I haven’t yet but it’s only a matter of time. ) The clippy thing needs to be squoze? a little while the white square is eased up over and and off of it. – The only other choice would be to leave this unit all together while I sand the eye-lids, and paint them and spray them with Sealer. So I take it off.
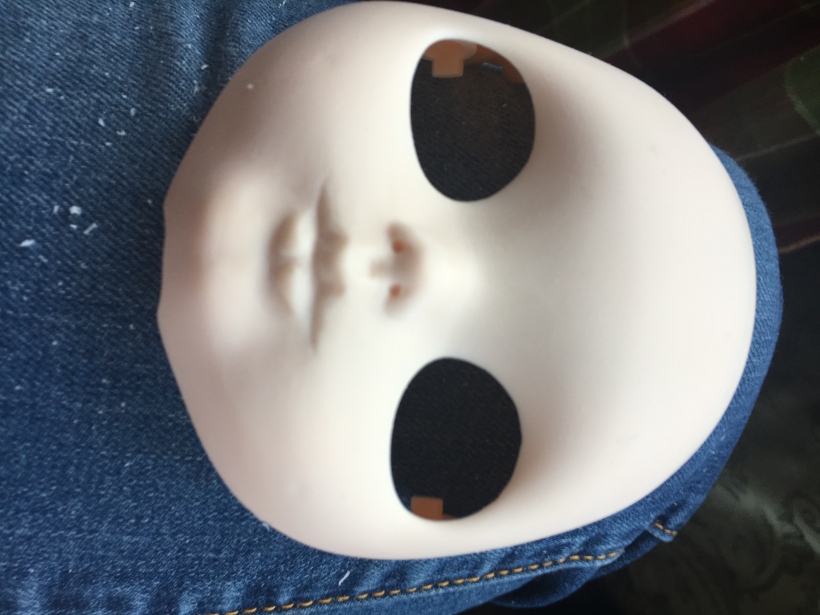
Once I have all of that apart- and I’ve pulled the string out and put it with the screws that I saved. I am ready to begin dolly surgury. Sanding- carving- painting- sealing. And eventually putting her back together again.  Here’s what she looked like after the first few minutes of carving and scraping. I actually used a pencil at the very beginning and drew right on her face, what shape I wanted her mouth to end up looking like. Using some measuring tools to help me keep her mouth centered and drawing that on her face was very helpful. Other sites I read, suggested sanding everything first, and then beginning the carving but after doing one doll already, that didn’t make sense to me. I carve, then I sand. You can see in the photo above that the first thing I did was to open up her eyes. On the ICY doll I found it necessary to get rid of the entire fake eyelid, AND open up the eye on the INSIDE UPPER corners, and the OUTSIDE LOWER corners. Again, It was very helpful to draw first and then carve.
  So here she is after a bit of carving and sanding. She’s wet because I carve her wet and I sand her wet. I’ve read some bad things about the toxic nature of the dust from sanding these plastics, so I wear a mask AND I carve wet/sand wet.
  Here she is about halfway through the painting process. A coat of Mr. Super Clean is sprayed on first (after sanding and before painting) to give the paint something to cling to. Most people, (including me on the doll above) use pastel chalks, and water color pencils to color the face. It has to be done in layers. So, add a little dusting of chalk. Then spray some matte sealer. Then add more chalk. Then more matte sealer. And I repeat this process until I reach the desired affect. I use a wet paintbrush and rub it on my watercolor pencils and use that on her lips. It must be noted that one must let the Matte sealer have proper drying time between spraying and adding more color.
*A NOTE ON MR. SUPER CLEAN or MSC as it is referred to. Every site I read said this is the spray to use, however! THIS IS TOXIC BAD STUFF! One whiff of it will tell you that. I bought some- ($20 on aliexpress) and I’ve used it on 2 dolls but I won’t buy anymore. Not with all the health warnings. If I had read all the warnings before I bought it, I would not have gotten it. I will use a different, less toxic, matte sealer made in America on my next doll. MSC should only be used while wearing an enclosed respirator type , well fitting mask, in an open ventillated area. And then get the heck away from it while it dries.
Here is Cordi, all put back toghether again. She is still waiting on new eyechips. I spent as much time trying to paint her eyechips, (unsuccessfully, I might add), as I did taking her apart and sanding/painting/putting her back together, combined. And I did NOT ENJOY IT, the eye chip painting, that is. I love carving. SO, I’ve ordered eye chips. After her eyechips come, she will also get eyelashes.
The end. – Or rather, just the beginning. ……For Cordi, anyway. As soon as her eyechips come in, she will be up for adoption at DeltaDawnBoutique.

Blythe Faces
I’ve been looking at a lot of faces. Blythe faces of course. Makeup, eyes, lips, chins, nose. There are so many different expressions I’m finding it very hard to decide what direction I want to do next. That is, what kind of expression or emotion do I want my next doll to portray? Part of me is going- well, which one will sell the best? And another part is saying, I could never guess what someone else might want, so I should just choose what I really like and hope there is someone out there with the same tastes as me. And then there’s the part of me that wants to keep every single doll, so I’m hoping no one else but me likes them.
Where do I look for Blythe faces? Pinterest is a great one. And then Etsy also has many styles to spark the imagination as well.
In the sewing department, I finished two more dresses. Both are gathered ruffly items.


Still need to add some sparkly purlple trim to the lavender dress. The white/pink dress is already in my etsy shop in DeltaDawnBoutique
I’m mystified at the wide range in pricing for Blythe Doll clothes. I saw many as low as $10 a dress, one even as low as $5 a dress, and then some as high as $175!? Now I understand that making a simple shift out of cotton isn’t going to take up near the time or the expense of say a handmade dress out of silk- but $170 difference? Then there were alot of dresses in the $20 range and quite a few more than I expected to find in the $35- $50 range. I need to decide what is required to charge (and get) $50 for a dress or an outfit for Blythe. Here’s what I’ve noticed.
1- I’ve seen “vintage” thrown around alot, as in ‘this dress has vintage lace or vintage silk’ on it. – okay- shop D.I. for old wedding dresses?
2- Some of the very expensive ones actually do look like they took a lot of time and are almost a work of art because of the way the artist has pulled together, fabric, trims, lace and beads to create something kind to the eyes. – So, think less of making a half dozen of one dress or another, but just make one, one that is over the top special.
3. Part of selling dresses on etsy though is making a name for oneself. Either by selling and getting good reviews or posting your creations in a public forum. like … Flickr? Maybe I should check that out.
So, my plan is to get busy and explore some elaborate designs that I would like to see done , and do them. Then, post them on public forums like flickr, or pinterest or facebook.
DONE! But only just begun
I did it. I dove in and did it. It was hard. It was easy. I learned lots but I have lots more to learn.
I followed the free tutorials on blytheverafter.com and then I consulted some youtube vidoes when the instructions on blytheverafter.com didn’t seem quite enough. I began writing down the steps in simplified form as I did them, so that I would have a path to follow back home again.
- remove the 3 screws from back of head and and place in a container and label-(important- especially if you are prone to losing things easily)
- remove plastic pull from string and place with the screws
- place doll on her side on a padded surface(folded bath towel works nicely), and with palm of hand (yours, not hers) apply pressure to side of her head at about the temple. Head should pop open at least at the jaw line.
- At this point either the back plate falls off easily or you will need to have an object inserted into the crack in between the front face plate and back of head plate and ‘help it’ to seperate. Mine fell apart easily. Yea!
- BEFORE pulling back plate off, reach in with jewelry pliers or a crochet hook and remove the tiny spring thats wrapped around the bar in the center of the rectangular slot in the back of the head.
- Once the back plate is off, ONLY LOOSEN the screw inside the head that holds the face plate to top of the skull. Once you are able to pull the scalp off,( and put in a safe place with the screws that you removed), then tighten the head plate screw back up a notch and leave it attached to the face place. ( It’s just easier, one less thing to loose.)
- Put the doll body with the scalp and screws for safe keeping.
- Remove the screw that holds the little plastic t-bar against the eye- mechanism and put them both with the other screws.
It was here that I got way too involved in the learning process to record any more.
I had to separate the eye-eylid unit mechanism. I used a blow drier as recommended to warm up the plastic and help it to bend and not break as I applied some pressure to the side of the head to pull it out and then the blow dryer trick to heat up then separate the eyes from the eyelids.
My best suggestion: WATCH SOME VIDEOS ABOUT THOSE TWO ITEMS ABOVE! It will give you confidence and help to avoid breaking your dollies poor head.
Once the doll was apart. I put the “Don’t lose these” parts in a box and away on a shelf.
And I spent the next 4 hours, sanding and carving. I sanded the backplace, the eyelids and the front plate, just as the video described. It would definitly not take me this long in the future. Most of that time was spent repeating the same process over and over. Sand, carve, sand, carve, sand, carve.
When I first began carving the lips, I was tired, and I lost my focus just a little. I didn’t put a piece of painters tape right down the center of her face to help me keep her mouth straight. And I didn’t mark out with a pencil the bacis shape of the mouth I was trying to accomplish. About an hour into the carving I could see that the bottom lip was somewhat askew. Not good. I got up and walked away for a while.
Yep, just got up and walked away. When I was sure I understood what I’d done and exactly what action I needed to take. That is, what need to be carved where in order to set things straight again. I sat down and began to carve again.
So I carved, straightened out the lip alignment- sanded. It seemed I sanded my definition of the lips away…. I carved more definition. I sanded. Again, poof, the definition seemed to disappear. I went back and watched a few more videos on youtube on carving. Went back one more time and carved again and this time I didn’t sand as vigorously.
I got a little nervous there at the end because I’d read of others first attempts and how they carved so much that they carved right through the face and then had a hole in their dolls face. Ruined!
Following all the steps, I started a make up job. Here I definitely could use some practice. You would think any women 50+ years would know how to apply makeup but…. My little Moonshine has a lot of makeup on her face. A lot of pink and marroon and burgandy. It is a warm and cheery glow- just like her name- Moonshine. There’s more- I painted a pair of eye chips- real ones. I loved them , they are green and gold. Then I added paint to her original chips( someone else suggested this, its not my idea). And it really didn’t change them much. It made them a bit darker. Then I pulled out her eyelashes and put her back together, which went just like clockwork. Easy-peasy.
No Sooner did I give Moonshine a new face, but I let her pose for New dresses for my etsy shop DeltaDawnBoutique@esty.com.


2nd Customization coming soon and I vow to take more step by step pictures next time!

Eleven Blythes!?!
I’m not sure how it happened but all of a sudden I’m up to 11 Blythes! Only 2 have arrived but I have 9 more on order. When they all arrive I will have:
Two Blythes with pink hair, one long hair , and one short
Three Blythes with red hair, one short, one long hair with bangs and one with curly pigtail braids.
One Blythe with short curly blond hair.
Two Blythes with short, wavy, darkest purple hair.
One Blythe, a Brunette with short hair
And a golden hair Middie Blythe.
OH!, And one With Flaming Orangy Red haired Blythe with a tan.
I really must begin to customize at least one of them. That’s why I orginally bought one, Right? To cusomize and then sell them? I lay awake half the night wondering which one I could possibly bring myself to give up? And the rest of the night I wonder If I’m really going to be as good at this as I think I am. After spending about $500 in dolls over the past month I better be. Wow- $500?! ? Yep. It’s Time to Start customizing!
In the meantime, I’m still sewing. I listed the first six dresses in my etsy store DeltaDawnBoutique, today. I offered them at ridiculously low, low, looooow introductory prices, just because there is a lot of competition on etsy and if people don’t try the cookies they will never know how good they are- or be able to write a review of how very good they are. And why?? So I can sell more cookies, of course.
WELCOME SEACILLIA
More SEWING! I really am going to get around to Customizing my little Blythes, but with SeaCillia, (thats pronounced Sea-cillia), just arriving yesterday and in need of a rest after her long ordeal, (40 days from order to delivery!), to say nothing about needing some clothes. We’ve made about 15 dresses so far. Anyway, we sewed AND I also watched tutorial slides from http://www.blytheverafter.com. and downloaded thier instrutions.
****Evidently Blytheverafter.com is the go to site for learning how to customize your first doll. They are meticulous in the directions, which are free at the site. That, along with watching youtube videos is helping to prepare me, hopefully, to make a success of my very first doll.
I have to admit I was feeling a little overwhelmed today after watching the videos. So many ways I could screw up, and so little time. But, after feeling like – What the heck was I thinking!! for a while, I finally calmed down and decided that the only way to eat an elephant is one bite at a time. So, I’m going to let what I watched sink in a little bit and come Monday, I will approach the project, one baby step at a time.
I WILL
… open up the doll without breaking it,
Take out the eye mechanism, and not lose the screws
Sand her face AND
Carve her face AND
Sand her face AND
Sand her face some more.
I WILL, Apply Mr. Super Clean Matte spray WHEN ( AND ONLY WHEN)
THE SANDING IS PERFECT.
I WILL paint her face, in layers,
with coats of Mr. Super Clean Matte spray in between layers.
all while using caution and a mask and gloves to protect myself from cancer causing fumes and plastic.
and
I WILL accomplish it.
I can do this.
And If you really want to- so can you.
